I am very happy to see there are lot of people appreciating my glass painting work asking me for more of glass painting designs.
As there were lot of mails in my inbox asking for designs i have forwarded lot of common designs to everyone.
So here i have some more designs which i liked the most i would like to share these designs patterns with you all.
So friends enjoy these new designs and if you need more designs please do feel free to mail me at reshmiONart@gmail.com. Will be sending you more interesting patterns.
Making stocking cloth butterflies pattern
Hi friends, back with a new butterfly. I hope you all got it. My earlier post got a little butterfly with yellow wings, that was my first try in making a stocking butterfly which came out good but was not that neat and perfect as it need to be.
So here is my second try on making a stocking butterfly which was actually a perfect one and a neat one compared to the first, so i am much more happy in making this cute little white butterfly.
So here is my new butterfly with small little round wings and cute little orange body with aluminium wire antenna fixed to it.
You can fix this anywhere on your room or make cards or to gift boxs or anything.
How is my new butterfly? Do comment friends.
Related Posts - Stocking craft
Stocking Craft - Stocking butterfly
Stocking craft colourful flowers
Absinthe Kubler Body Painting
Group body painting on semi-nude women with the Absinthe Kubler logo.
Related posts:
* Red Bull Body Painting
Related posts:
* Red Bull Body Painting
Microsoft Windows Internet Explorer 8 Wallpapers, Imahes, Pics
Microsoft IE 8 Wallpapers | Download Free Wallpapers of Microsoft Internet Explorer 8. I used this and it's very nice browser, i think now Firefox and Chrome may be out of market or they might loose their popularity. From few months (1 or 2) Firefox has some problems when we open more than 10 tabs, firefox hang and we need to restart browser, now IE 8 is best option in replace of it.
Click & Download IE 8 Wallpapers
Red Bull Body Painting
Body painting on semi-nude women with Red Bull logo. Red Bull energy drink was recently banned in Germany due to traces of cocaine in their produce. Read Red Bull Cola Laced With Cocaine
Body Painting - Cyclist
An old painting of nude woman cyclist.
Related posts:
* Body painting - Cyclists
* Body painting - Sports - Snooker and Golf
Related posts:
* Body painting - Cyclists
* Body painting - Sports - Snooker and Golf
Body Painting - Embodied
Artist Kim Joon lives and works in Seoul, South Korea, and creates these unusual artworks with body forms.
Starbucks, Adidas
Dragon, monkeys
bird land-chrysler
Starbucks, Adidas
Dragon, monkeys
bird land-chrysler
How to make stocking butterflies
Friends here I'm back with a new post and that too not about quilling craft, this is stocking craft. I have earlier done a post on stocking flower Flower Making - Colourful Stocking flowers, you can check to know the making of stockings.
In my post Flower Making - Colourful Stocking flowers you can learn the proper technique and also the instructions will be much easier for you all to try out new techniques in stocking craft.
So here is tried out making a stocking butterfly. As this was my first try in making butterfly I'm very much happy with the results. You need to use the same technique as of stocking flowers. Aluminium wire needs to be turned into butterflies wings shape as needed.
I'll be posting more butterflies of different varieties and will be sharing with you all. I hope you all will like this one, awaiting your valuable comments and suggestions.
This is my stocking butterfly. How is it ?
Related posts - Stocking Craft
Stocking craft colourful flowers
Stocking craft white little butterfly
In my post Flower Making - Colourful Stocking flowers you can learn the proper technique and also the instructions will be much easier for you all to try out new techniques in stocking craft.
So here is tried out making a stocking butterfly. As this was my first try in making butterfly I'm very much happy with the results. You need to use the same technique as of stocking flowers. Aluminium wire needs to be turned into butterflies wings shape as needed.
I'll be posting more butterflies of different varieties and will be sharing with you all. I hope you all will like this one, awaiting your valuable comments and suggestions.
This is my stocking butterfly. How is it ?
Related posts - Stocking Craft
Stocking craft colourful flowers
Stocking craft white little butterfly
How to make Kusudama Flower ball
Kusudama paper flower is an ancient old Japanese craft. These are Origami paper shapes glued together. These are basically used for decorations.
I have here made this kusudama ball as good decorative piece. Here i explained step by step method for kususdama flower making. I hope you all will enjoy this new technique.
Materials required:
1. Origami paper (any colour)
2. Glue
Method:
1. First of all you need to cut around 60 square pieces each of 7cm x7cm.
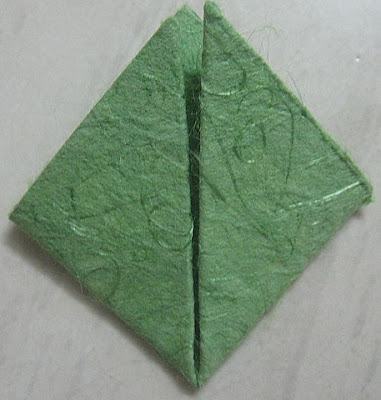
2. Here is the first step after you cut the first square piece. Fold the bottom corner to the top. You will get a triangle shape by this.
3. Fold the left and right corners up to the middle corner and make a square shape.
4. Fold the same points down. Do the same folding to both sides.
5. Open up the flaps and flatten them. Flatten both the sides equally.
6. Fold the top triangles towards you so they are level with the edges of the paper.
7. Fold the triangles back using the crease you made earlier and glue the outside triangles together ans you will again get a square shape.
8. Now fold the two together and glue it.
Similarly make 5 petals for one flowers. Glue all together and make a flower. Similarly make 12 such flowers.
Now glue each flowers one by one to the petal and make half circle. This way you will make 2 half balls.
Here is the way to make Kusudama ball.
Body Painting - Flower - Roses
Body painting of flower. Roses.
Related posts:
* Body painting - Flower - Series #4
* Body painting - Flower - Series #3
* Body painting - Flower - Series #2
* Body art - Flowers - Sunflower
* Body art - Flowers
Related posts:
* Body painting - Flower - Series #4
* Body painting - Flower - Series #3
* Body painting - Flower - Series #2
* Body art - Flowers - Sunflower
* Body art - Flowers
Body Painting In Air New Zealand Ads
Air New Zealand crews go naked in body paint in a promotion video ads (called nothing to hide) to promote their airline.
Hand painting - Seaworld - Clown Fish
Hand painting of sea world create, Nemo the Clown Fish.
Related posts:
* Hand painting - Zebra
* Hand painting - Alligator
* Hand painting - Geese
* Hand painting - Elephant
* Hand painting - Dog
* Hand painting - Cat
* Hand painting - Eagle
Related posts:
* Hand painting - Zebra
* Hand painting - Alligator
* Hand painting - Geese
* Hand painting - Elephant
* Hand painting - Dog
* Hand painting - Cat
* Hand painting - Eagle
Hand painting - Turtle
Hand painting of sea world creature, the turtle head.
Related posts:
* Hand painting - Zebra
* Hand painting - Alligator
* Hand painting - Geese
* Hand painting - Elephant
* Hand painting - Dog
* Hand painting - Cat
* Hand painting - Eagle
Related posts:
* Hand painting - Zebra
* Hand painting - Alligator
* Hand painting - Geese
* Hand painting - Elephant
* Hand painting - Dog
* Hand painting - Cat
* Hand painting - Eagle
Hand painting - Seaworld - Whale
Hand painting of seaworld creature, the whale.
Related posts:
* Hand painting - Zebra
* Hand painting - Alligator
* Hand painting - Geese
* Hand painting - Elephant
* Hand painting - Dog
* Hand painting - Cat
* Hand painting - Eagle
Related posts:
* Hand painting - Zebra
* Hand painting - Alligator
* Hand painting - Geese
* Hand painting - Elephant
* Hand painting - Dog
* Hand painting - Cat
* Hand painting - Eagle
Quilling pattern - Husking earrings design
Today i am back with a new technique on quilling. I'm here with husking pattern on quilling.
Huskings are made by winding paper around a pattern of straight pins. I have some the pattern of husking and step by step method on how to make husking.
I hope you all will enjoy the new technique.
Basic steps for husking.
1. Get a trace paper where you can make the dotted points. See the picture below.
2. Place pins on each holes as shown.
3. Using a length of paper, gently crease one end and “hook” it around the pin numbered 1.
Bring paper up and wind around pin number 2 and then back down to pin number 1. Glue where the paper overlaps at pin number 1.
5. Bring paper up and wind around pin number 3 and then back down to pin number 1. Glue where the paper overlaps at pin number 1.
6. Bring paper up and wind around pin number 4 and then back down to pin number 1.
7. Bring paper up and wind around pin number 4 and then back down to pin number 1.
8. In the same way continue to wind up and bring back to pin number 1 from pin 6 and pin 7. It should look this way.
9. After you finish this roll the strip starting from pin number 1 roll on each points and bring back to pin number 1.
In this way you will get the completed husking pattern.
Now you can decorate any thing with this patter or make greeting cards or some cool earrings just like the one i made.
Related Posts - Quilling earrings
Quillied Accessories - Quilled earrings
Quillied Accessories - Quilled necklace pendant
Quillied Accessories - Quilled Red earrings
My Favorite Quilling Books
Subscribe to:
Posts (Atom)